Gutter guards are a simple and effective solution for reducing gutter clogs and preventing water overflow. They act as a barrier to keep leaves, twigs, and other debris out of your gutters while allowing rainwater to flow freely. Installing gutter guards can save you time on maintenance and protect your home from potential water damage. Fortunately, installing gutter guards yourself is a manageable DIY project. Here’s a step-by-step guide to help you install gutter guards and improve your home’s protection.
What Are Gutter Guards and Why Install Them?
Gutter guards, also known as gutter covers or screens, fit over your gutters to prevent debris from entering while allowing water to pass through. They are available in various types and materials, including mesh, foam, brush, and reverse curve designs. Installing gutter guards provides several benefits:
- Reduced Gutter Cleaning Frequency: Fewer leaves and debris mean you won’t have to clean your gutters as often.
- Enhanced Water Flow: Gutter guards help prevent clogs, allowing rainwater to flow smoothly and reducing the risk of overflow.
- Prevention of Pest Infestation: They reduce the chances of pests like birds, rodents, and insects nesting in your gutters.
Types of Gutter Guards
Choosing the right gutter guard depends on your needs, budget, and the type of debris common in your area. Here are some popular options:
- Mesh Gutter Guards: Fine metal or plastic screens that block debris while allowing water through.
- Foam Gutter Guards: Foam inserts that sit inside the gutter, blocking debris but allowing water to pass through.
- Brush Gutter Guards: Resemble large pipe cleaners and sit in the gutter to block debris.
- Reverse Curve Gutter Guards: Designed with a curved top to let water in while pushing debris off.
Mesh and reverse curve guards are often the most effective for high-debris areas, though they may be more expensive than foam or brush guards.

Tools and Materials Needed
For a typical DIY installation, you’ll need:
- Gutter guards (appropriate length and type for your gutters)
- A ladder (use a sturdy, well-positioned ladder for safety)
- Work gloves
- Tin snips or scissors (for cutting the guards to fit)
- A drill and screws (if your gutter guard type requires fastening)
- Measuring tape
- Safety goggles
Step-by-Step Guide to Installing Gutter Guards
Follow these steps to ensure a smooth and safe installation:
Step 1: Clean Your Gutters
Before installing gutter guards, it’s crucial to start with clean gutters. Use a gutter scoop or small shovel to remove leaves, dirt, and other debris. Then, use a garden hose to flush out any remaining debris and ensure water flows freely through the gutters and downspouts. This step prevents any pre-existing clogs from interfering with the gutter guard installation.
Step 2: Measure Your Gutters
Measure the length of your gutters to determine how much gutter guard material you’ll need. It’s better to buy a little extra than to run short. Also, measure the width of your gutters to ensure the guards will fit securely.
Step 3: Position the Ladder and Ensure Safety
Set up your ladder on stable ground, preferably with a helper for added safety. Use a ladder stabilizer if available, and make sure you’re wearing gloves and safety goggles to protect your hands and eyes from sharp edges and debris.
Step 4: Cut the Gutter Guards to Fit
Most gutter guards come in standard lengths and may need to be cut to fit the dimensions of your gutters, especially at corners and downspouts. Use tin snips or heavy-duty scissors to trim the guards to size. Take your time to make precise cuts, as any gaps could allow debris to enter the gutter.
Step 5: Install the Gutter Guards
The installation process will vary depending on the type of gutter guard you choose:
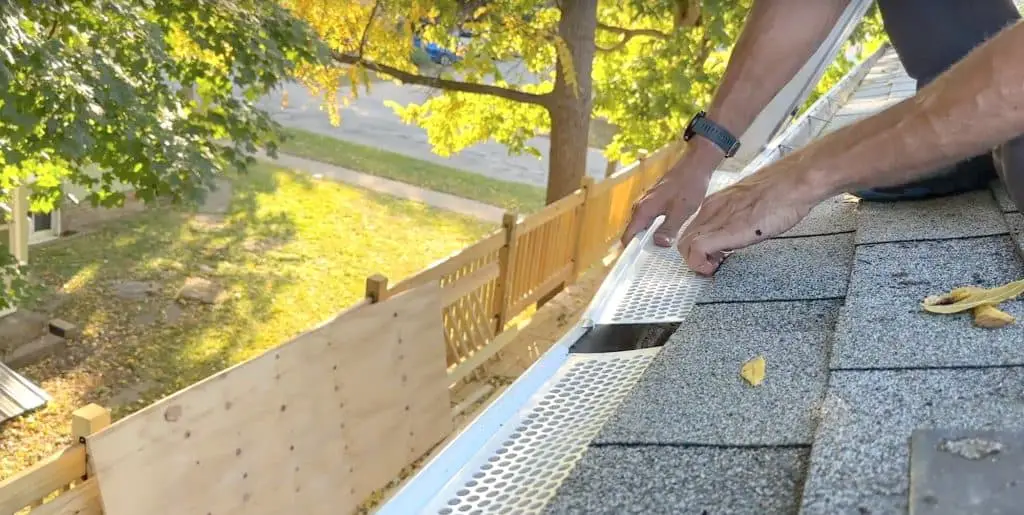
- Mesh and Screen Guards: These are typically placed on top of the gutter and attached with clips, screws, or by tucking under the roof shingles. Start at one end of the gutter, secure the guard with screws or fasteners, and work your way to the other end. If your guards are designed to fit inside the gutter, gently press them in place.
- Foam Guards: Simply press the foam inserts directly into the gutter, ensuring they sit snugly and don’t leave any gaps.
- Brush Guards: Place the brush inside the gutter with the bristles facing upwards. Position them evenly along the length of the gutter to block leaves and other debris.
- Reverse Curve Guards: These typically require a more secure attachment. Position the curved edge over the edge of the gutter and screw or snap the guard in place according to the manufacturer’s instructions.
Step 6: Secure the Guards (If Required)
Some gutter guards require additional fastening. If your guards come with screws or clips, make sure they’re securely attached to the gutter to prevent them from shifting during heavy winds or storms.
Step 7: Test the Water Flow
Once your gutter guards are installed, test the water flow to ensure they’re functioning correctly. Use a garden hose to pour water onto the roof and observe how it flows through the gutters and guards. Make sure there’s no overflow or leakage along the edges.
Step 8: Perform Routine Inspections
Even with gutter guards, occasional maintenance is essential. Inspect your gutters every few months to make sure no debris has bypassed the guards and no clogs have formed. After each storm season, check that the guards are securely attached and free of obstructions.
Tips for a Successful Gutter Guard Installation
- Choose Quality Materials: Invest in high-quality gutter guards, especially if you live in a high-debris area. While more affordable guards can work well, premium options often provide better long-term results.
- Check Manufacturer Instructions: Each type of guard may have specific installation requirements, so follow the manufacturer’s instructions closely.
- Avoid Overlapping: Avoid overlapping guards as this can create gaps where debris can enter.
- Work Safely: Always prioritize safety when working on ladders and roofs. If your home has a multi-story gutter system or if you’re uncomfortable with heights, consider hiring a professional for the installation.

Final Thoughts
Installing gutter guards is a relatively simple DIY project that can help protect your home, reduce maintenance time, and improve water flow efficiency. With the right tools and a careful approach, you can complete this project in a single day and enjoy the peace of mind that comes from knowing your gutters are well-protected. By choosing the right type of gutter guard and following this installation guide, you’ll save time, prevent clogs, and extend the life of your gutters.